Tuesday, June 7, 2011

bakery shmakery. homemade rosemary focaccia is the way to go!

someone asked me in the midst of the Atkins craze a few years back if, being the foodie that i am, i would ever consider doing a low-carb diet.  my response was a loud outburst of laughter and then i answered with a heartfelt "no".  my reasons are twofold:

1) i really really don't like to eat chemically altered food, and fake sugars top that list.  i don't trust things that emulate natural flavors.  to me, sugar is sugar and should be enjoyed in moderation, not in a "substituted" form.  i will choose a regular Coke over a 'diet' or 'zero' one million percent of the time (and i am not a big soda-drinker at all, so that's where the moderation thing comes in).  but things like splenda, sweet and low, and even stevia are big no-nos for me.  low-carb things tend to use a lot of these fake sugars because they are free of calories-- but the trade off is a truckload of chemicals.

2), i love pasta, rice, potatoes, and bread.  a lot.  again, i eat them in moderation and select the whole-grain options, but i just couldn't see myself throwing them out of my diet.  while we are on the topic of bread-- there are few things in this world that i love more than a fresh-out-of-the-oven roll or loaf of bread.  as my mother has always said, "bread is just a vehicle to get the butter to your mouth", but i believe the opposite.  the bread itself is the prize.

this brings us to the delicious recipe of the day:  homemade rosemary focaccia bread.  for those of you who are so unfortunate as not to have tasted this kind of bread, it is full of olive oil, topped with big flakes of sea salt, and fresh rosemary.  it is the perfect bread for panini sandwiches, or to dunk in a little bit of table-olive-oil before an italian feast-- or really just to eat on its very own.  it has a rich flavor and a dense consistency, and almost nothing in the bread world can beat it.  so i say "thhhbbbbbbtttt" to Atkins and invite you to enjoy this scrumptious recipe!

i searched far and wide for a focaccia that had the right balance of olive oil in the dough.  some breads can get really soggy and (as good as olive oil is) when you can taste the actual oil instead of just taste the flavor, you know you went too far.  this is adapted from Anne Burrell's go-to recipe.

here's what you'll need:
-1 and 3/4 c. of warm water (warm to the touch-- not boiling hot!)
-1 tablespoon of sugar
-1 package dry active yeast
-5 c. AP flour (all-purpose)
-1 c. good olive oil (1/2 c. for inside dough, 1/2 c. for top)
-1 tbsp. salt
-coarse salt (for the top)
-1 head garlic, in tact
-1 sm. bunch fresh rosemary

the first step is to proof the yeast, which should be nothing new by now (to all my trusty readers!).  in a large bowl, dump the yeast, warm water, and sugar (to feed the yeast) and mix around gently with a spoon.  this mixture needs time to rest (about 15 minutes) until you can start to actually smell the yeast activating.


while this proofs, you can start to get the dry ingredients together.  combine your 5 cups of AP flour in a large bowl (sift it if you'd like) and add the 1 tbsp. of salt.  mix well, making sure the salt is well dispersed.  by the time the yeast is proofed, it should look like this! it smells to me like the beginnings of warm bread, or a yeast-y beer, and will have formed a layer of foam.


with the super awesome bread hook attachment to your hand/stand mixer, combine the flour mixture, yeast mixture, and 1/2 c. of your olive oil.  if you don't have a bread hook, a spoon and some patience will do just fine :).  mix until the dough is no longer lumpy (could be about 4 or 5 minutes) and gets a smooth consistency.


if your dough is still a little sticky, you can always add a few more sprinkles of flour when you turn it out of the bowl on to a floured surface.  knead the extra flour in a few times and you should be all set.


in the same bowl (wipe it out a little to get the excess flour off), coat the sides and bottom with the rest of the olive oil (about 1/3 c.).  add the ball of dough back in to the oiled bowl, cover tightly, and let it rest for at least an hour.  this is the first proofing.  the dough will have about doubled in size when you check on it later.

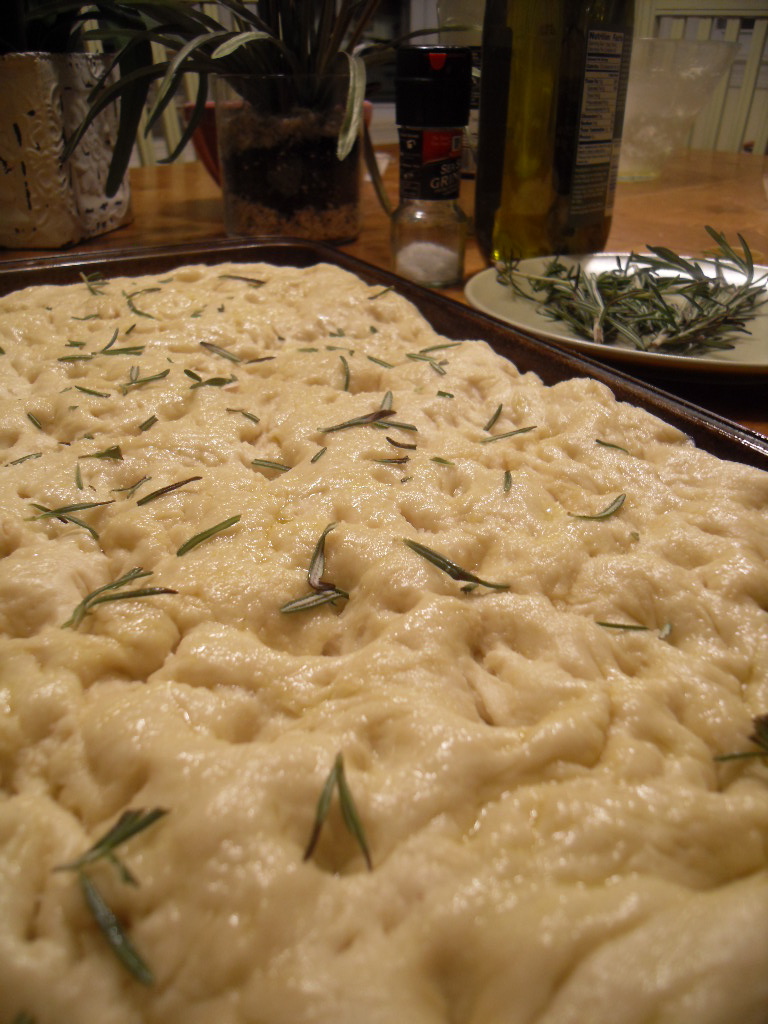
after it has proofed once, dump the risen dough on to an oiled baking sheet (or something long and rectangular with sides like a jelly roll pan) and start to spread it out to the sides.  this is where focaccia gets its signature "craggy" look-- be rough with it when you spread it out!  take your fingers and punch holes in it as you stretch it.  if you don't make actual holes, the dough will rise and smooth out.  the goal is to puncture the dough.  it should look like this:


now its time for the final proofing: take a tea towel and cover the pan.  let it rise again in a warm place for another hour.  when you check on it later, it will still be craggy but much puffier, like this:


now for the fun part-- the topping.  this is my favorite way to flavor the focaccia, but feel free to mix it up and add your favorite things!   i reserved a few tablespoons of olive oil and drizzled it over the top of the dough.  i then took an entire head of garlic (peel on) and sliced it in half across the center (like cutting a roll for a sandwich) and with the cloves exposed, rubbed them directly on to the focaccia dough.  this adds a very mellow garlic note.  next, take a sprig of fresh rosemary and chop it in to rough and pretty pieces.  sprinkle this all over the top of the dough, pushing it in slightly.  the last touch is a sprinkle of fresh sea salt.  yummmmmm.

toss the dough in to a 425 degree oven for around 20 to 30 minutes, rotating every 10.  the oiled baking pan almost fries the dough on the bottom and the screaming-hot oven crisps the olive oil on the top making it golden brown and delicious!

after it has cooled completely (if you can wait that long after being teased by the heavenly aroma for half an hour), either use the loaf immediately for sandwiches or anything else your heart desires, or seal it up very tightly in a ziplock bag for later use.  the bread also freezes beautifully (i'd suggest cutting it in to sandwich size pieces first so you can just pull it out when you need it!) but will stay fresh for up to four days in the fridge.

now for my decadent masterpiece:


see?  wasn't that easy as pie?  now i bet you will never go buy focaccia bread at a bakery again.  plus, your kitchen will smell wonderful each and every time you make it yourself :)

stay tuned for my next post where i will showcase this beautiful bread as the base for a prosciutto pizza and a caprese panini.

buon appetito!

Thursday, June 2, 2011

what's better than one cookie? a cookie inside another cookie!

firstly, let me apologize for my near month hiatus.  there is really no excuse, so i will fabricate one.  i got in a fight with this huge dragon and just now got out of the hospital.  yep, that’ll do.
____

i was reading all my favorite food blogs one day towards the end of the semester (when i probably should have been studying for finals) and a particularly interesting food photo caught my eye.  it was simple but striking: a chocolate chip cookie with a Oreo nestled in the center.  the center was revealed by the photographer’s “service charge” i assume; one clean bite.  even for someone who does not have much of a sweet tooth, i wanted one of those gooey confections immediately.

lucky for me, my best friend was coming to stay with me for a few days.  this was the perfect recipe to try at the exact right moment-- like the Cooking Gods had aligned the stars.

Bonnie and i decided to go ahead and make the classic CCO (chocolate chip oreo) but we also wanted to play around with other combinations.  so we got some sugar cookie mix and Grasshopper cookies (like a thinner thin mint).  what we really wanted were tagalongs, but alas it was not girl scout season. 

i didn't bother to make my own cookie dough for this recipe because the real point of these cookies is to see how crazy you can get.  but it’s totally up to you-- make your own if you would like!  

we whipped up a batch of chocolate chip and a batch of sugar cookies (a bag of the mix, an egg, and a stick of butter) and made sure to refrigerate the dough for about half an hour before we used it.  this is actually important because if you are working with warm cookie dough it will spread like crazy in the oven and you will end up with stuffed cookies that look like UFOs.  i should also mention that this was a little bit of trial and error for us, so don’t worry if they don’t look perfect.

while the dough chills, get your “inside” cookies ready!  we used the Oreos and Grasshoppers.  but if you would like a different kind, go for it.  you could even put in those fun sized candy bars.

to make the CCO’s, take a small ball of the chocolate chip dough and press it in to the oreo on all sides.  you don’t want to use too much- just enough to cover the cookie completely (it should be a fairly thin coating).  you can think of it this way:  take as much dough as you would to make a regular sized chocolate chip cookie and stretch it around the oreo.

place the cookies about 6 to a big baking sheet (as they will spread some, so be careful!) and pop them in a 350 degree oven for between 8 and 12 minutes.  but definitely keep and eye on them so that they don’t burn!

when they come out, let them cool for about 5-10 minutes before you cut in to them.  this way they will keep their shape and not crumble!  Be patient :)


while these cool, take the sugar cookie dough out and go through the same process covering one or two Grasshopper cookies (stack ‘em if you’d like!).  the sugar cookie dough will naturally spread more than the chocolate chip will, so be very careful not to use too much dough. (they'll be tasty, but deformed hahaha)  Reduce the time in the oven for these guys- between 6-10 minutes. 


we also tried a couple different variations: sugar cookie and oreo, chocolate chip and Grasshopper, and even a sugar/chocolate chip oreo (half and half!).  my personal favorite was the sugar cookie and oreo because it really showcased the oreo flavor, and i found it got lost among the chocolate chips in the other kind. 


all in all this dessert was so sweet, it’ll knock your socks clear off.  i don’t think it is humanly possible to eat a whole one by yourself, but these are great cookies to cut up and share. 

so i hope you enjoy these as much as our arteries did :)

Monday, May 2, 2011

a preppy easter bunny? we must be in charlottesville.

in preparation for easter (i know, i know-- that was last weekend), my friend Lindsay and i spent all day saturday baking easter treats and dying easter eggs.  it was the most beautiful day to bake with the windows open and we could step out on to the balcony and watch the hustle and bustle of 14th street from way above.  now, i don't really go all out in celebration of easter-- for my family it has always just been a holiday filled with egg hunts and dinner with all the grandparents, aunts, uncles, and cousins.  Lindsay, on the other hand, enjoys her big easter production and let me in on some of her family traditions.  one of them, which she assured me was non-negotiable for easter, was a bunny cake.

but before we get in to the confections.. let's take a look at the beautiful easter eggs we dyed!

i will mention again that i really despise eggs.  they are icky in every form unless i cannot taste them because they have been baked into a cake.  but even crepes and french toast taste too eggy for me.  so, needless to say, i do not like hard-boiled eggs either.  i think my dislike stems from getting food poisoning (or just sick) after eating eggs when i was little, and ever since i just have really not had a taste for them.  even their smell makes me cringe.

luckily, lindsay said she'd make egg salad or something out of them, so i wasn't stuck with the 18 we hard-boiled to dye.  we got two of these little dying kits-- one traditional and one glittery.  it was so much fun!  we got all the dyes ready in their cute colored cups and played around with the wax crayon making pictures and swirls.

this was always one of my most favorite parts about easter at home-- the egg dying-- so it was great fun to be able to continue the tradition on my own at school.

the glitter eggs were awesome too-- they went in to a little plastic bag and with one or two drops of this oil based dye rubbed all over, they were perfectly coated!  you could even make them tye-dyed :)


here's a look at our plethora of easter eggs, to be made in to egg salad the very next day:


so what about this bunny cake?  its actually really sweet and fun to make-- a perfect project for the kiddies!  Lindsay makes this KILLER chocolate cake from a recipe she happened upon, so we decided to make the bunny chocolate and cover him with thick white buttercream frosting, and some colored icing for his little bunny features.

to make the cake, taken from this recipe, you will need:
-2 cups boiling water
-1 cup unsweetened cocoa powder (we used 1/2 c. regular cocoa, 1/2 c. dark cocoa, yummm)
-2 3/4 c. AP flour
-2 tsp. baking soda
-1/2 tsp. baking powder
-1/2 tsp. salt (this is important!  don't skip it!)
-1 cup (2 sticks) butter, (room temperature, softened)
-2 1/4 c. white sugar
-4 eggs
-1 1/2 tsp. vanilla extract

first things first, put your cocoa powder into a heat-proof bowl and dissolve with a whisk it in the two cups of boiling water.  this may look and smell like chocolate heaven, but remember that it is unsweetened cocoa-- so it tastes bitter at this point!  i would advise against sampling it with a spoon.  let this cool (stick it in the freezer if you have room!) before you add it to any other ingredients.


next, in a stand mixer or with a handheld version, cream the butter and sugar together as usual.  add the vanilla to the mixture and then slowly add the eggs one at a time to make sure they are incorporated fully.  then, in a separate bowl, mix together your flour, salt, baking soda and baking powder.  now here's the fun part: alternate adding the dry ingredients with the cooled liquid chocolate until everything is mixed and smooth.  here's the delectable batter:


new, this recipe is really for 3 9-inch baking pans, but we used two of the big high-sided kind to make thicker cakes.  do whichever you prefer!  separate the batter into the butter-greased and floured pans. (don't know how?  watch this incredible video!) bake in a 350 degree oven for about  30 to 40 minutes (these cakes are super dense!) until a toothpick comes out clean in the center.  let these cakes cool completely before you cut in to them to make the bunny!

for the buttercream frosting, you'll need:
-1 box confectioners sugar
-1 stick of butter
-1 tsp. vanilla extract
-milk (to add a tablespoon at a time)

to make the frosting, simply cream the butter and sugar in a mixing bowl until smooth.  then, add the vanilla and one or two tablespoons of milk.  mix again and check the consistency.  if it looks like frosting to you (thick, spreadable, no lumps), its done!  you really will not need much milk because there is moisture in the butter and the vanilla-- so be very careful with how much you add!

when the cakes are cool, find a large surface big enough to hold your finished bunny cake.  its long and cumbersome, so i would recommend a large cookie sheet or platter.

the first step is cutting one of the cake rounds into the bow tie and bunny ears. you only need to make two cuts on the circle: one curve cut at the top and an identical one at the bottom. follow my picture and you'll be all set!


the middle section is the "bowtie" and the little sections turn in to the bunny ears.  feel free to sculpt away until you get the shapes you want.

next, take the uncut round and place it in the middle of your cookie sheet.  underneath, place the "bowtie", and add the ears at the top.  surprise!  it looks like an adorable little bunny rabbit!


frost it with your white frosting on all sides.  be careful because there will be cake crumbs that could get into your frosting layer!  it happened to us but we were completely okay with it-- it looked like an oreo bunny :)  decorate its face with colored icing and you will have a precious little easter bunny cake!  


why do i call our easter bunny preppy, you ask?  well because of its green-and-pink-checkered-Lilly-Pulitzer-inspired bowtie of course!  

only in charlottesville.  but i love it :)

Thursday, April 28, 2011

delightful, sweet, hallongrottor cookies!

the other day, i was in a baking mood (as seems to happen frequently when i'm procrastinating...), and i decided to make another swedish treat.  hallongrottor, or raspberry thumbprint cookies as you may know them, are soft, buttery shortbread cookies that have a delicious drop of raspberry jam in their centers.  they are really very quick and easy to make, keep well in a cool place, and definitely satisfy that sweet tooth :)

*swedish lesson!: those silly swedes call our thumbprints "hallongrottor", which really means "raspberry caves", after the little well of raspberry preserves in the middle of the cookie.  how sweet!*


here's what you need for around 30 cookies:
-1 cup of softened butter (room temp if possible)
-2 cups of flour
-2/3 c. of granulated sugar
-1/2 tsp. baking powder
-1 tsp. cinnamon
-1/2 tsp. almond extract (this isn't traditional, but i love raspberry and almond together!)
-your favorite raspberry preserves

first things first, cream the butter and the sugar in a bowl with a big spoon.  this is why you need room temperature butter-- so everything mixes up well.  don't use melted butter or your dough won't turn out with the right consistency!  

next, add the almond extract.  as i mentioned above, this is not a traditional ingredient in the dough, but i really do love raspberry and almond together in just about anything!  so this is optional-- put it in or leave it out, whichever you choose!

next, prepare the dry ingredients for mixing.  you'll need two level cups of all purpose flour, 2/3 cups of granulated sugar (as much as 3/4 c. if you like your shortbread really sweet), 1 tsp of cinnamon, and 1/2 tsp. of baking powder.  stir the dry gently in to the butter and sugar until everything comes together in a smooth dough.  throw this in the fridge for half an hour or so, just so the butter can firm up before you start to make the cookies!

after the dough has chilled, take it out of the fridge and split it in half.  take each half of the dough and roll it in to a long log shape, about 1 1/2 inches in diameter, or smaller if you'd like smaller cookies. once your dough is in this form, cut half inch slices and line them up on a baking sheet with some room in between.  check out these cuties:


next comes the fun part: the thumbprint!  i actually use my pointer finger with these cookies because they are a little too small for my thumb.  in any case, push down lightly on the cookie and make a small indentation in the center.  this is where the preserves go :)


last step before baking, the raspberry!  take some of your preserves and stir it around until its a little looser than regular jam.  with a tiny spoon, fill the "caves" you made in the dough.  


finally-- the oven!  bake at 350 for about 12 minutes, making sure to keep a close eye on the cookies.  they are full of buttery goodness, so they have a tendency to burn if you're not careful!  let them cool completely before you enjoy them (i knowwww, its such a hardship!) and store the leftovers... on the off chance that there are any :)


enjoy your little raspberry caves!

Monday, April 25, 2011

easter dinner at the ivy inn! jealous?

i was fortunate enough to enjoy my easter dinner at The Ivy Inn in Charlottesville yesterday.  we had spectacular weather: blue skies, a little bit of a breeze, and a toasty temperature (too hot for me, but still nice).  the restaurant is a little converted house off of ivy road and had beautiful gardens and prime picture-taking spots.

as for the food?  well it was divine.  we started out with some mediocre amuse bouche (so i didn't bother taking pictures), but the rest of the meal was so delicious.

it was a set easter menu that provided a few choices for the appetizer and the entree, with a salad course in between.  i chose the asparagus soup with lump crab meat, a sprinkle of bacon, and chervil.  it was silky smooth, smoky from the bacon (which i don't generally care for at all, but it was just perfect in this context!), and the chervil was a bright note at the end.

Asparagus Soup

the next course was the salad course.  it was fresh greens with paper thin radishes and cucumbers, in a light basil vinaigrette.  it was served with two pieces of bread: one was a rosemary french bread and the other was an almond brioche.  the salad was topped with a huge slice of parmigiano cheese and fresh cracks of black pepper.  yummm!

Mixed Local Green Salad
now for the main course-- and by far my favorite course.  i chose the grilled canadian chinook salmon filet which was delightfully pink in the center and seared with a crispy top.  it was served on top of a bright green pea puree and sauteed spinach.  the show stopper for me were the scalloped potatoes: nearly fifty layers of potatoes cut thinner than a potato chip, with cream and sharp cheese to hold everything together.  the potatoes were on top of a whole grain mustard sauce which was tangy and a perfect complement to the delicate salmon.  i almost licked my plate clean!

Grilled Chinook Salmon and Scalloped Potatoes
dessert was one of the richest things i've ever eaten. it was a duo of sweets.  the first was a "torta ciocolatta", or a really fudgy chocolate cake, with cappucino semi-freddo on top (which is really just soft ice cream), and a caramel and creme creme anglaise.  the second was marinated strawberries in an almond cookie "bowl", with a mascarpone zabaglione drizzled over the top.  it was sinful.  (sorry for the poor photos-- the light was coming in strangely on the table by the time dessert arrived!)


the whole meal was delightful and a perfect easter treat.  hope you enjoyed your meal as much as i did mine!  a big thanks to the Kijewskis for their generosity and easter cheer :)

Thursday, April 21, 2011

top ten favorite foods: pretzel power!

there are really very few foods on this planet that can top pretzels.  they can be small and crunchy right to the center, or big and puffy and soft with just the right crust on the outside.  no matter what, these little salty guys make it on my top ten favorite foods list.  and, knowing my love of food, thats saying a lot!

the other day, when my friend beth asked if i wanted to make soft pretzels (what a silly question to ask me, right?), i nearly jumped out of my skin.  i realized that i had never actually made them before!  i eat them with such frequency, yet they have never come out of my own kitchen.  i was so very excited for this opportunity :)

can you resist these beauties?


they are about the easiest thing to make and here's what you need:
-1 package of dry active yeast
-1 1/2 tbsp. sugar (to feed the yeast!)
-1 1/2 c. warm water
-1 tbsp. salt
-4-5 cups of flour
-1 egg
-coarse salt

first thing's first, dissolve the packet of yeast in a big bowl with the 1 1/2 cups of warm water.  like i mentioned in my last post about the kanelbullar, the yeast is ALIVE so make sure not to use hot water or you will kill it!   once dissolved, add the sugar to feed the yeast and stir again.  this is your yeast base!  add the salt and make sure everything is dissolved well in the mixture or your dough may not rise!

next comes the flour.  you can use white flour or a mixture of white and wheat, whichever you prefer.  we had white on hand so that's what we used!  slowly, about half a cup at a time, stir in the flour to the yeast mixture with a fork.  the fork does two things: doesn't mash the flour around like a spoon would (making the dough really tough!), but it also fluffs the flour through the wet mixture better than a spoon would.  add enough flour (4 or 5 cups!) until the dough forms a ball like this!  knead the dough for a good 5 minutes until it comes together with no lumps and bumps.


**don't let this rise!** this is not the time for your dough to rise (quite yet) so work semi-quickly and start to shape your widdle pwetzels. we made 10 big pretzels out of this dough, but you can make them bigger or smaller depending on your needs.  

take a piece of dough and roll/stretch it out in to a long rope.  make this thinner than you think you need to because the dough will rise and expand!

now to twist your pretzel, either 1) go to auntie anne's pretzel university, or 2) watch this kind of terrible video... and voila!  you'll get these:


once you twist your pretzels, let them rest under a tea towel for about 20 minutes and they will proof.  the puffed pretzels then get a coat of egg wash (one egg and a little bit of water), and coarse salt right on top!


the little fatties go into the oven at 425 for 5 to 8 minutes, or until the tops are perfectly golden brown and delicious. 


here is the final product!  eat them with yellow mustard and nom to your heart's content :]  skål!


Thursday, April 14, 2011

kanelbullar: swedish cinnamon buns!

for a couple months now, i have been learning swedish, slowly and painstakingly, through books and online resources.  the other day i came across a lesson on food vocabulary (HOORAY!) that was so kindly accompanied by photos of all the food.  i say kindly because it was great to see snapshots of the words i was learning, but it was also incredibly frustrating because i wanted to eat every single swedish food that popped up.  so, i decided that i would embark on a journey of making swedish delights.  the first one that i want to show you is one of my favorite things in the entire world, cinnamon buns (kanelbullar)!

these sweet, yeasty, buttery buns are very traditional in sweden.  its common to eat them while drinking some coffee or tea during a relaxing break in the middle of the day.  this wonderful pastime is called "fika" and i plan on partaking in it daily when i visit stockholm this summer.

these kanelbullar are very different from the pillsbury ones you buy in the pop-tubes.  but, don't worry, they are a million zillion times better!  it is a bit of a time consuming process to make these beauties because there is a double-rise on the dough, but i assure you that they are worth every second. i've adapted this from the Rutiga Kokboken recipe on this website, so i think its pretty darn authentic.

here's what you'll need (in american measurements!):
for the dough:
-1 stick of butter, melted
-2 c. whole milk
-2 packets of active-dry yeast
-1 c. sugar
-1 tsp. salt
-1 tsp. cardamom (optional, its expensive!)
-6 or 7 cups flour
for the filling:
-1 stick of room-temp butter
-1/3 c. sugar
-2 tsp. cinnamon
for the tops:
-1 egg
-pearl sugar (or sanding sugar)

we'll start with the dough, as it needs to proof for about 45 minutes.  first, start by melting one stick of butter into a bowl.  then, add the two cups of whole milk and heat them up together in the microwave until they are warm to the touch, but NOT boiling hot.

next, let's talk about yeast.  if you don't work with it often, it can be intimidating, but its really very easy to use.  most american recipes use active-dry yeast, or the stuff you see in the packets of 3 on the baking aisles.  yeast is a leavening agent (aka the thing that makes your bread rise) and its alive!  so the idea with yeast is that you need to dissolve it in warm liquid and feed it with a little bit of sugar, and BAM!  it expands like crazy!


for this dough, you'll need two packets of dry yeast.  empty the two packets into a large bowl and pour a small amount of the warm milk/butter mixture in to the yeast (enough to cover all the yeast).  at this point, you still need to feed the yeast, so add a tablespoon or so of sugar.  stir all of this together until the yeast is mostly dissolved.  once dissolved, combine the rest of the milk and butter in with the dissolved yeast. this is the base for your dough!  next, we will tackle the dry ingredients.

to your wet mixture, add the cup of sugar, tsp. of salt, and the cardamom.  if you don't have cardamom on hand, you can substitute cinnamon (like i did!).  once this is all mixed in, start slowly adding 2/3 of the flour a cup at a time.  mix the dough gently with a spoon until it comes together and off the sides of the bowl.  if its really sticky, add more flour until the mixture forms a loose ball. here's what my dough looked like in stages:

after three cups of flour
after five cups of flour
once your dough is to this stage, cover it with a towel and leave it alone for 45 minutes so it can proof.  it will almost double in size!  while it proofs, its time to make the delicious cinnamon butter! 


its super simple-- just take a bowl and smush your room temperature butter with a fork.  then, add the 1/3 c. of sugar and 2 tsp of cinnamon (or more to your taste).  stir it around and toss it in the fridge until your dough is finished proofing so it doesn't melt any further!

once that pesky 45 minutes is up, take the towel off the dough and check out how much it has risen.  cool, right?  here's what mine looked like:


take your fist and punch the dough down-- it will deflate almost immediately.  dump it out on to a floured surface and knead it for a good five minutes, until it comes together into a smooth dough without any lumps or bumps.  cut the dough in half and roll each half out into a thin, flat rectangle, one at a time.  i used a large baking sheet for my guide.  while you're rolling the dough out, take the butter and cinnamon spread out of the fridge and let it come back up to room temperature.  


once rolled and flat, spread half of the cinnamon mixture all over the dough.  make sure to spread out to all the edges and corners, too!  start to roll the dough from the top to the bottom.  roll this pretty tight-- you'll want a nice beautiful spiral when you cut the individual cinnamon buns!


take the whole roll and lay it out on a cutting board.  get some pretty muffin papers out and set them on a cookie sheet.  cut the cinnamon buns in to 1 1/2 to 2 inch rounds and place each one in a muffin paper.  each roll should yield about 10 buns, but you can make them bigger or smaller to your liking.  these make good individual sized sweets to eat with a cup of tea or coffee.

for the second proof, throw a towel over each cut cinnamon roll and let them proof again for 20 minutes.  


after the second proof, brush the top of each kanelbulle with egg wash (one egg and a little bit of water or milk), and sprinkle them with pearl sugar or sanding sugar.  this will give them a sweet crust and a golden brown top!  place the buns in the oven (teehee) for 8-10 minutes on 450 F.  but keep an eye on them!  they puff up like crazy and can burn easily.  so just make sure you peek every few minutes!

when they finish baking, you will officially be in heaven.  if the 10 minutes in the weren't torture enough because of the intoxicating smell, just WAIT until you taste one!  i really have to use a lot of self-control to just eat one of these little cuties.  


i like them just the way they are, but you can whip up an easy icing for the tops if you choose.  just take some powdered sugar, a little bit of your whole milk, and a dash of vanilla and drizzle it on the tops while they are still warm.  

smaklig måltid!  enjoy!