Sunday, December 26, 2010

a lemony birthday treat for a sweetie!

just before we started exams in early december, my adorable roommate celebrated her 19th birthday (lucky her-- she had to study that night!).  we decided to order pizza and hang out at the apartment for a low-key celebration instead of going to Boylan as we do traditionally for every birthday.

and as is custom, i whipped up a delectable birthday sweet in honor of her big day!  now, my silly roommate is known for eating cookies for breakfast, and croissants with nutella multiple times a day-- she definitely has a sweet tooth.  i decided to make some cupcakes instead of a whole big cake so that she could snack on the leftovers all by herself!

it was super simple, but elegant and a little different from the traditional chocolate or vanilla confection.  i started with a common boxed yellow cake mix (i like to use dunkan hines because it is really, really moist) and baked it according to the directions on the back of the box.  i used a regular muffin pan but skipped the liners since i didnt have any on hand (use 'em if you'd like!).

while the baked in the oven, i started the extra-special component of these cupcakes--the lemon simple syrup!  i eyeballed these measurements, but i added about 1/3 c. lemon juice and 1/8 c. water along with 1/8 c. of regular cane sugar to a small saucepan.  turn the heat on low and stir the mixture until the sugar has completely dissolved.  the syrup should be sweet, but very lemony (not tart).  it won't be the consistency of syrup-- don't worry!
i took the cupcakes out of the oven and out of their muffin tins so they wouldn't continue cooking.  now for the fun part: take a long-tined fork or some poking implement and pierce the cupcakes several times all over the top.  once poked, take two spoonfuls of the lemon syrup and pour right over the cupcakes into the pokes you've made.  this will keep the cake SUPER moist and delicious, and will also add a sweet lemon flavor.  

now don't throw out the rest of the syrup that you don't use!  i wanted to make a light lemon glaze for the tops of these cupcakes, so i used the leftover syrup as the liquid base for the frosting.  take the syrup (i had about 1/6 c. left) and add in about two cups of powdered sugar.  i know this sounds like a lot, but powdered sugar dissolves almost instantly and you'll need a lot of it for just a little bit of liquid!  keep adding sugar until it makes a semi-thick glaze.  i added a few drops of yellow food coloring to the frosting for a cute sunshiny look!

take the slightly cooled cupcakes from their resting place (a baking sheet works well) and carefully turn them top-side down into the glaze, letting the excess drip down the side of the cakes when you put them upright on the baking sheet.  let the glaze harden slightly on the tops before you enjoy them!

these cupcakes are inexpensive, super easy, and very impressive!  plus, they keep wonderfully in the refrigerator for a few days (if they even last that long!) because the simple syrup keeps the cake moist and delicious.


happy 19th birthday, marwa!  heres to many more fun ones together!

Saturday, December 11, 2010

sweet treats and holiday eats!

i promised you a whole cookie-post, didn't i?  well today is your lucky day!  this will be a fairly long posting because i have had the pleasure of making zillions of cookies with friends over the past few weeks.  get your sweet-tooths ready!

i hosted a cookie swap for my lovely Belles the other weekend, which turned out to be a great success.  for anyone not familiar with the concept, a cookie swap is a party that you throw for a big group of friends where everyone brings around two-dozen cookies to swap for everyone else's creations, and everyone leaves with a whole assortment to take home.  there are just a few rules i imposed on my guests: no store-bought cookies, no nuts (allergy reasons), and no plain ol' chocolate chip cookies. but i didn't limit the baked-goods to just cookies-- bars and brownies were also welcomed. with sixteen Belles, we sure had a great variety of sweets!

since i was the hostess for the event, i decided to make two different sets of cookies (some for swapping, some for eating!) and provide hot spiced cider, the movie "Elf", and holiday music.

i am a fan of a good shortbread cookie and decided to make that the base for my two different kinds of christmas cookies.  i hunted around for a great recipe online and settled on making a key-lime meltaway shortbread, and a peppermint crunch shortbread (for the cute red and green theme).  they were so incredibly simple to make and packed a lot of flavor!

here's what you need for each batch: (i've color coded the ingredients specific to the flavor you're making)
-3/4 c. of room-temp butter, unsalted (that's 1 1/2 sticks)
-1/2 c. confectioners sugar (and more for dusting at the end)
-1 3/4 c. plus 2 tbsp. all-purpose flour
-2 tbsp. cornstarch
-1/8 t. salt
-1 tsp. pure vanilla extract (we all know how i feel about that imitation garbage)
-zest of two limes
-2 tbsp. fresh squeezed lime juice
OR
-1 1/2 tsp. peppermint extract
-1/3 c. crushed candy-cane or peppermints
-1 tsp. red food-coloring


to make the dough (whichever you choose), cream the softened butter and 1/2 c. confectioners sugar in a bowl.  then add the vanilla, lime zest and lime juice or the peppermint extract and the crushed peppermints to the mixture and combine.


next, add the flour, cornstarch, and salt carefully to the butter and sugar, and mix gently until the dough comes together.  it won't look like a smooth dough but rather kind of crumbly (like shortbread dough should!).  at this point, add the red food-coloring if you're making peppermint dough.  adding it this late in the process makes the color just barely mix in so the dough looks like a pretty red marble!

take the dough out of the bowl and transfer it on to a flat work space.  using confectioners sugar to dust it if you need to, knead the dough slightly until it comes together in a ball.  then, form it into a log shape with the circumference of about a tomato paste can (or around 2 in. diameter).  put the log on a piece of plastic wrap and wrap it tightly, sealing both ends.  these are ice-box cookies, so they'll go in the fridge to chill for two hours, and when they come out you can slice 'em and bake 'em!    

when you're ready to bake, preheat your oven to 350 degrees and slice the cookies into about 1/3 to 1/2 in. thickness (depending upon how many you want to get out of the batch!).  bake on a 
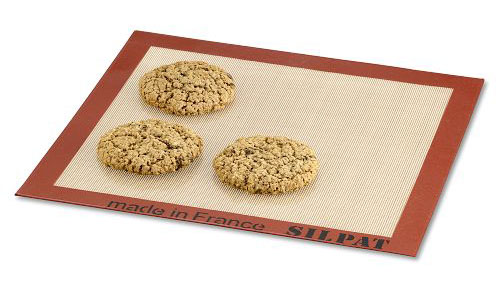
silpat-lined cookie sheet if you have one, or on an unlined regular cookie sheet for 8-10 minutes.  *note: when you take a batch out of the oven, let the pan cool completely before you put another batch on it (or use another cookie sheet).  if you use a hot pan, the butter will start to melt before its in the oven and your cookies might burn!*

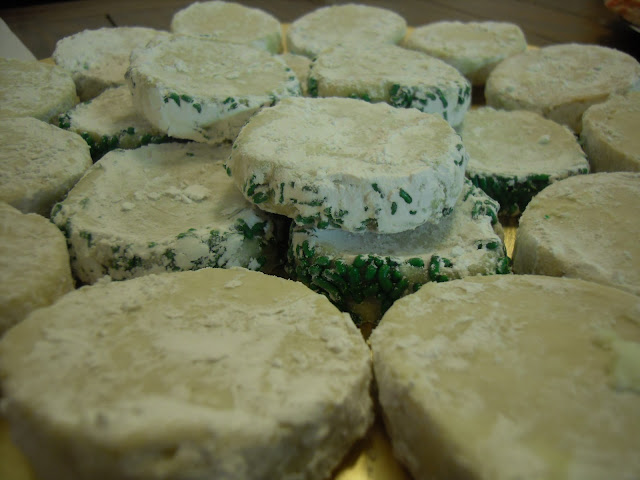
once completely cooled, decorate the cookies however you'd like.  the traditional way to finish the lime meltaways is to toss them in powdered sugar.  i decorated the outside edge on some cookies with green sprinkles and then tossed them in the sugar.  for the peppermint cookies, i made a quick glaze (1 c. powdered sugar and a few tablespoons of milk) and topped them with red and white sprinkles.  here's how they came out!


along with the cookies, i mentioned that it was my duty to provide spiced cider.  this is the easiest thing in the world, and much less expensive than buying gallons of cider from the store for 5 bucks (or more!) a pop!  i purchased 3 gallons of 100% apple juice on sale at the grocery and some whole cinnamon sticks.  in a large pot on the stove, i added the juice (in batches), 1 tsp. nutmeg, 1/2 tsp. ground cinnamon, and three broken cinnamon sticks.  i let it sit on the stove on very low heat (so the sugars wouldn't burn) until my guests arrived.  i served it up in mugs with some whipped cream on top!

there are too many photos of cookies to post (although they were all absolutely divine), but i can surely name them all.  we had snickerdoodles, seven-layer bars, chocolate chip rice-krispy treats, no-bake cookies, peppermint and chocolate angel-food cake, forgotten cookies, snowflake sugar cookies, peppermint creme bars, chocolate mint cookies, and oatmeal chocolate chips.  i can confidently say that we were all in sugar comas by the end of the evening.  

***

just last night, i had another cookie party, but this time it was all about baking and decorating sugar cookies.  a bunch of good friends stopped by and we managed to bake off about 4 dozen heart, snowman, and flower cookies.  

because sugar cookie doughs are a dime a dozen, just use your favorite recipe.  i rolled my dough out to about 1/4 inch and we punched the shapes out from there.  the nice thing about rolled-dough is that you can mush the scraps together and roll it out again!  batch after batch baked for about 12 minutes and cooled outside before the next one went in. (yep, since its so cold outside, i just pop my cookie sheet outside my doorstep on the concrete steps and it cools off in no time!)

my mom bought me these adorable little holiday sprinkles: one was candy canes, one was holly leaves and berries, and the last was snowflakes.  we made homemade buttercream frosting (1/2 stick of softened butter, 1 1/2 c. powdered sugar, 4ish tablespoons of milk, splash of vanilla) to apply a thin layer on the tops of the sugar cookies, and then got to decorating!  here is how they turned out:


we ate a bunch (who wouldn't?) and plated a bunch more to drop off a friends' houses in the area.  what a nice study surprise!  i wish you all happy holiday baking and hope you will try some of these delicious recipes--or a cookie swap of your very own!

Thursday, December 9, 2010

go greek! (with some spanakopita!)

in the midst of studying for a million exams, i decided to take a break and make dinner that would yield enough leftovers for me to nom on throughout the next few days.  during one of my study breaks, i flipped on Barefoot Contessa and Ina was making spanakopita.  PERFECT.  i made a whole batch and they are the perfect thing for dinner the first night, breakfast in the mornings (really its just spinach and eggs and cheese!), and a light lunch with a salad.  not too many ingredients later, i had the most delicious spanakopita, which i am actually eating as i blog this :]

if you search for ina's recipe for spanakopita, it has a million ingredients and a million steps.  i simplified mine waaaay down and it is even better than i imagine her's would have been.  who needs one tablespoon of pine nuts or 2 tablespoons of green onions?  it is still kind of time intensive to make because we are working with phyllo dough, but i promise it is completely worth the trouble!

start off with collecting your ingredients:
-two 10 oz. frozen packages of spinach
-one medium onion, chopped
-one clove garlic
-two eggs
-1/4 c. breadcrumbs
-1 1/2 c. reduced-fat feta cheese
-1 roll of phyllo dough (about 28 sheets), thawed in the fridge
-6 tbs. of butter
-olive oil, S&P
-nutmeg
-crushed red pepper flakes

start by defrosting your frozen spinach blocks.  i threw mine in the microwave (unwrapped from their packaging) in a glass bowl for about 6-7 minutes, stirring, then again for 5 minutes.  once it is all defrosted, put it in a colander and squeeeeeeeeze all the water out.  it should look like this!


next, chop up one medium sized onion and sautee it up in a skillet with some olive oil and a minced clove of garlic until the onions are soft and slightly caramelized (about 5 or 6 minutes on med.)

let both the onions and the spinach cool (stirring occasionally to release the heat) before you move on to finish the filling.  why?  we're adding eggs next and you don't want them to scramble because your other ingredients are hot!

in the mean time, get your phyllo dough out of the refrigerator and unroll it out on a large cutting board.  you'll see that it is incredibly delicate and made of a million layers that you can separate from one another.  i used 5 sheets per batch of 2 spanakopita, so i made about 10 delicious bundles by the end.  melt 5 tablespoons of butter in a bowl and using a pastry brush (or if you don't have one, get a paper towel, ball it up, then use that to mop the layers!).  carefully take one layer of phyllo and lay it down on the cutting board.  brush it with melted butter (very, very carefully so you don't rip it!) and then lay down a second piece of phyllo on top of the buttered layer.  continue this until you lay down the 5th layer which you don't need to butter.  cut the stack right down the middle lengthwise to get dough for two spanakopitas.  it should look like this!

now to finish the filling:  combine the spinach and the onions together in a bowl and mix together.  take your reduced-fat feta cheese (crumbled) and put about a cup and a half right in the filling (the more the better in my opinion!)  season with S&P, 1/2 to 1 teaspoon of nutmeg (go easy on this, its a strong spice!), and a sprinkling of crushed red pepper flakes.  once seasoned, add two beaten eggs and 1/4 c. of breadcrumbs, which both act as binders so your filling isn't runny!  here's what mine looked like:

now for the assembly (which i will kindly show you in photos!).  start off by placing 1/3 c. of your delicious filling at the bottom of each phyllo half.  next, you will be rolling these spanakopita up like a flag!  take a bottom corner and fold it diagonally into a triangle shape (making sure all the filling stays in!).  
  
                        
then continue to fold the triangles up like a flag until you get to the very end.  then take the little last corner and brush it with butter to help it stick when you make your last fold.  then voila!  repeat this entiiiiire process until you run out of filling and/or phyllo dough.  brush the tops of the spanakopita with the remaining tablespoon of melted butter and place them on a baking sheet.  *note: you won't need to butter/spray your cookie sheet for these babies.. they have enough butter to non-stick themselves!*


bake these beauties off in a 375 degree oven for about 25-30 minutes until they are golden brown.  and then use an extreme amount of self control... because you will want to eat all ten spanakopita right when they pop out of the oven.  (i may have had two and a half...)


enjoy these flaky, buttery, salty spanakopita for the perfect greek night!  (oh, and you can make these half-sized for appetizers... but who would want to eat a smaller version of these when you can have a big one?) :]

Monday, December 6, 2010

flashback to childhood: aroni pasta!

so when i was growing up, my mom made dinner almost every night.  occasionally, she would have back-to-school night or parent-teacher conferences, so she would get home late and my dad would be in charge of dinner.  in my household, we made a menu every week so we always knew what was for dinner and who would be home when.  on those nights that my dad would have to cook, my mom would ask me and my brother what we wanted him to make.  and every single time we would shout the same thing and it always made its way on to the menu... aroni.


the name does require a little bit of an explanation, but i honestly couldn't tell you the whole story behind it.  all i know is that it is similar in very few ways to the "rice a roni" box pasta meals, but that our much more delicious version took a piece of its name.  why its called specifically "aroni" i couldn't tell you, but i guarantee if you like pasta, vegetables, and cheese, you will not be disappointed!

since this was a meal my dad could make for us kids, it is pretty simple.  here's the ingredient list:
-one box of wagon-wheel pasta (no other shape will do.. this is KEY to making aroni!)
-one jar of your favorite marinara sauce (or make your own!)
-one pint of mushrooms, sliced
-one green pepper
-one medium onion
-one large bag of fresh baby spinach
-1/2 lb. of your favorite kielbasa sausage
-one bag of the shredded cheese of your choice (cheddar, mozz, anything will do)
-soy sauce (i'll explain later...)
-garlic
-olive oil, S&P

first thing's first: put a large pasta pot of water on to boil.  my dad always started off by chopping up all the veg.  dice the onion, dice the green pepper, and slice the button mushrooms (if they aren't already pre-sliced).  toss them in a large skillet with a little olive oil and a nice spoonful of minced garlic (or one fresh clove).  sauté until tender!

at this point, drop your wagon-wheels into the boiling water and cook according to the package directions!  (8-10 minutes generally)


next, cut up your kielbasa (ready-to-eat, not raw) into small pieces and toss into the skillet with the vegetables.  sauté this all together until the sausage is heated through.  at this point, add a splash of soy sauce.  this was my dad's secret ingredient and he always added it to his aroni-- it gives the whole dish a new layer of flavor and adds a nice salty bite to the vegetables!  drain the pasta and let it cool in the pasta pot while you finish the sauce. 
now for the last few things:  add the ENTIRE box of fresh baby spinach to the skillet and cook it down until it has wilted and absorbed the flavor of the other vegetables.  once wilted, add the jar of marinara sauce to the mess o' veg and cook until everything is heated together.  season with salt and pepper to taste!  finally, add the simmering sauce to the pasta in its pasta pot and stir it around until everything is coated with flavor.  for my favorite part, add a few large handfuls of shredded cheese to the mixture and toss it around until it gets all melty and incorporated. 

 dish up in a large bowl with a fork and an appetite!  this is such a delicious blast from the past, and i hope you enjoy it as much as i do!  thanks for making this for me, daddy!

Aroni a la John

Sunday, December 5, 2010

beef stroganoff... good for the soul.

now that i am back from the thanksgiving hiatus (where i stupidly forgot to take pictures because i was so excited about eating dinner that night...), i would like to wish you all a happy holiday season!  the holidays are my absolute FAVORITE time of year.  decorations, holiday music, snow fall in charlottesville, family and friends, and of course, christmas cookies.  but that is for a later post.

today i would like to share with you the recipe for the most delicious beef stroganoff i have ever consumed.    it is simple, inexpensive, and it makes a whole ton of food, so this would be a perfect dish to serve to guests around the holidays!

lets start with the obligatory ingredient list:
1 lb. of beef tenderloin (i used the more inexpensive cut called "stir fry" beef because its cut in to perfect strips already!)
1 medium onion, sliced
1 pint of baby portobello (or white) mushrooms, sliced
1 can low-sodium beef broth
1/3 c. reduced-fat sour cream
3 tbs. butter
2 tbs. AP (all-purpose) flour
1 lb. flat wheat (or egg) noodles
olive oil, S&P
parsely for garnish

this dish is deceptively simple and totally delicious.  start by coating a skillet with a little olive oil and sauté the tenderloin strips until they are just browned on all sides.  **note: you don't have to cook them through now since they will finish cooking in the sauce later on!  put them aside.  then in the same skillet, melt 1 tbs. of butter and sauté the sliced onions and sliced mushrooms until they are tender.  set these aside in the same bowl as the beef tenderloin.

*note on slicing onions:  wanna know how to get those perfect half moons?  slice your onion in half from top to bottom (not around the middle) and put your halves cut side down on the cutting board.  then going in at an angle from the side, slice your onions into thin strips.  they will separate and be perfect every time!

next, put a large pot of water on to boil for the flat noodles.  add a splash of olive oil so that the noodles don't stick to each other!

now for the sauce:  start by melting two tablespoons of butter in the same skillet we've been working in. once it has melted, add two tablespoons of flour and cook the mixture until it turns a light brown color (remember, this is a roux!).  once it starts to smell nutty, add your one can of beef broth and stir to combine.  make sure you stir as you add the broth or your sauce may get lumpy!  the roux will start to thicken the beef broth after a few minutes, but keep stirring to make sure that the sauce doesn't burn.

once it has thickened, add 1/3 c. of reduced fat sour cream right to the sauce, stirring it in well.  this is the point where you'll want to check your sauce for seasoning-- salt, pepper, maybe even some dried oregano or crushed red pepper if you want a little kick!

drop your flat noodles in the boiling water (they only take about 7-8 minutes since they are flat!) and add the tenderloin, mushrooms, and onions right in to the sauce to simmer away.  let the meat and vegetables sit and finish cooking in the sauce until your noodles are ready.

once everything is set to be plated, grab a large platter (or serve on individual plates).  put the noodles down in a nice big pile on the platter and then ladle the stroganoff sauce right on top.  garnish with some fresh basil leaves or crisp flat-leaf parsley for your green pop of color :]

and here is what you'll end up with!  a quick, simple, healthy dinner for you and yours this holiday season!


serve with toasty garlic bread or a nice wheat roll and some honey butter.  buon appetito!

Thursday, November 18, 2010

what's better than grilled cheese and tomato soup?

everyone likes grilled cheese and tomato soup.  its just one of those meals that no one can hate.  i do admit, for most of my life i was not a tomato soup fan (at least the stuff from the campbells can), but recently i have developed a taste for it.  grilled cheese on the other hand, now that was something i have always liked-- i suspect i did even in my previous lives.

this week, since i knew i wouldn't need a ton of food because i'm leaving to go home for thanksgiving so early, i decided just to pick two dishes to make and live off leftovers.  the beauty of grilled cheese is that if you have the ingredients, you can make a fresh and hot sandwich at the drop of a hat!  the soup, on the other hand, is not so quick.  so i made a big ol' pot of it and just warmed up the leftovers right out of the fridge!

here's what i gathered from the grocery for the soup:
-three medium/large and ripe tomatoes, two fresh cloves of garlic, half of a vidallia onion (or whatever kind you have on hand), one can of low-sodium chicken stock, a cup of fat-free half and half (leftover from making the butternut squash soup!), olive oil, S&P, and a pinch of red pepper flakes.

i started by washing, "eighthing" (cutting in to eighths :] ), and seeding my three tomatoes and laying them out on a baking sheet. i gave them a quick glug of olive oil and S&P and tossed them around.  on the same sheet, i cut up half an onion into small roasting chunks and halved two cloves of peeled garlic.  i tossed the pan in the oven at 400 degrees for a good half an hour (moving them around occasionally) until they got all caramelized and soft.

once all the vegetables had roasted, i added them to a pot of simmering chicken stock (one can) that i added a good pinch of crushed red pepper flakes to.  *note: add the red pepper flakes while the stock is still cold and bring it up to a simmer all together, your stock will take on a spicy heat from the peppers!**

i simmered everything together for a minute or two and then added salt and pepper to taste.  right before i was ready to blend, i added a cup of the fat-free half and half to give the soup it's "cream of tomato" look.

using my wonderful Magic Bullet, just like the butternut squash soup, i pureed my cream of tomato until it was nice and smooth and creamy. (i'll show you what it looks like at the end :] )

ladle it up into a bowl or your favorite mug (this is my all time FAVORITE way to eat soup!) and serve it along side my delicious grilled cheese... coming right up!

---------------------------------

for the grilled cheese, i pick up a few ingredients:
-a loaf of the most nutty and delicious whole-grain bread you can find, fresh basil, a fresh tomato, and sliced cheeses of your choice-- i used provolone, muenster, and havarti--, and butter.

i found this nine-grain bread at The Krog (or kroger...) that hadn't even been sliced yet.  mmmm!  i cut it myself into a little thicker slices than normal sliced bread just to make the sandwich substantial.  just look at this beautiful loaf!

while i preheated my skillet (or you can use a griddle if you have one) to medium, i sliced some super thin slices of tomato on my cutting board and laid them out next to my freshly washed basil.

next step:  the cheese!  i laid out a piece of muenster on one half of the bread and then the tomato right on top.  over the tomato i put a piece of round provolone cheese and topped that with three or four large basil leaves.  finally, i topped the whole thing with a piece of havarti and closed the sandwich with it's other piece of bread.


i spread each side of bread with a little bit of butter (so you get that beautiful golden-brown crust!) and grilled it in the pan on both sides until the cheese got melty all the way through.  i usually cut my sandwich diagonally, but when you make this meal for nostalgia sake, cut it the way your momma always did :]


so, tell me, what's better than a lunch (or dinner!) of grilled cheese and tomato soup?  nothing.  that's right. nothing.  whether it's cold and rainy, you're feeling a little under-the-weather, or you're just missin' mom, this is the perfect meal for any day.


enjoy!

Monday, November 15, 2010

ooey gooey cheesy mac

one of my dearest girlfriends and i had been trying and trying to plan a cute dinner night for what seems like forever, but our schedules just didn't match up.  when we finally found a night that were were both free, we decided to go all out and make our most favorite food-- baked macaroni and cheese.  we have a long history of eating mac&cheese together, so it seemed like a perfect choice.  along with a fantastic movie, we were ready for a great night!

we started by gathering the ingredients:  one box of elbow macaroni, 12 oz. of extra sharp cheddar cheese (grated), 4 tablespoons of flour, 2 cups of skim milk, 1/2 c. of fat-free half and half, 1/4 cup (one stick) of butter, S&P and nutmeg.

we boiled up the macaroni noodles and had them cool off while we shredded our cheddar cheese.  since we realized we didn't have a cheese grater or anything of that kind, we had to cut the cheese (hahahahaha) into small planks so they would melt down easily. cut it into the smallest pieces that you can!


once all the cheese was "shredded", we moved on to melting the butter in a medium saucepan and added the flour and cooked it together until it was brown and nutty (remember, this is making a roux!).  then, add the milk and cream and bring the mixture to a simmer so the flour can start to thicken the milk.  add the nutmeg and cook until the sauce just coats the back of a spoon like this:


next, add the cheese in small batches and stir until it melts down and the sauce gets gooey.  be careful to keep the heat on medium low so that you don't scald the milk or burn the cheese.  taste the cheese sauce and add salt and pepper to taste.  then, take the macaroni noodles and stir the whole thing together in the saucepan.  ready to see the gooey mess?


man, just looking at this makes me wish i was eating it now!  there's only a few more steps, i promise!  put the noodles and cheese into a casserole dish that is lightly buttered or sprayed with cooking spray (to make clean up much easier).  we decided to add fresh tomato slices right to the top along with a panko breadcrumb topping (panko breadcrumbs and one tbsp of butter toasted in a pan-- but not pictured!).


pop the casserole into the oven for about 20 minutes at 350 degrees until everything is warm and bubbly.

ready?  are you ready to see it?  IT LOOKS SO DELICIOUS.


please enjoy responsibly :]

Thursday, November 11, 2010

personal potpies, please!

the other day while i was at world market (where i should really not even be allowed to enter with a credit card), i found these absolutely precious souffle ramekins on sale for $3 for a set of 4.  my mind started racing with recipes for things i could make in cute individual servings: molten lava cakes, three-cheese souffles, flan, individual baked macaroni and cheese... and of course, the classic potpie.

i decided to make a lighter version of the classic potpie with crust only on the top instead of all the way around, so the ramekin worked perfectly.  i made my filling, ladled it in individual portions, topped the whole shootin' match with pie dough, and in the oven it went.

i started by prepping the veg: cut up two medium stalks of celery, two medium carrots, and one small onion in similar sized pieces.  this is called a mirepoix (look at all these fancy cooking terms you're learning, hahaha!).  heat up a tablespoon or so of butter along with a splash of olive oil in a pan. *note:  the butter gives the veg flavor when you're sauteeing them, but it can burn easily.  mixing in a splash of oil helps keep it from burning!*  sautee the veg in the pan with some S&P until they are soft.

after about 5 or 10 minutes of sauteeing, it's time to start the roux.  add about three tablespoons of flour right to the pot and stir it around to coat the veg.  let the flour cook until it toasts and loses its raw-flour flavor.  next, add one 14oz. can of chicken broth and 3/4 cup of fat-free half and half (or 2% milk or heavy cream) to the pot and stir in half a pint of quartered baby button mushrooms.  bring up to a simmer and watch the mixture thicken (thanks to that roux we made!).

while it simmers, take a fresh rotisserie chicken (or leftover white/dark meat from dinner the night before if you have it in your fridge), and shred the meat into a bowl.  you'll need about two cups for four potpies. once your sauce has thickened, add the chicken to the pot and stir.  at this point, taste and season with S&P and a pinch of nutmeg.  finally, add a big handful of frozen peas and stir until everything is warm and the filling has thickened.  *note:  is your filling too runny?  spoon some of the liquid from your pot and put it into a small bowl with another tablespoon or so of flour, and whisk until completely smooth (this is called a slurry).  pour this back into your pot and stir until it gets thick!*


now its time to fill the ramekins!  make sure they are good and clean and then set them up on a cookie sheet.  ladle the potpie filling in to each one, making to leave some room at the top.

take a sheet of pie dough from the refrigerated section of the grocery and roll it out slightly to make it a little thinner.  find a bowl or tupperware that has a slightly larger opening than the ramekins and use it to cut out four potpie tops. you'll want some extra dough around the sides so you can stretch it over the ramekins!

once you have the pie dough on the top, put a little egg-wash on top (one egg and a few teaspoons of water, beaten up) and take a sharp knife and slit the top so that the steam can escape while the pies bake.  bake them in the oven according to the pie dough directions on the box.  the filling is already nice and hot, so all we're doing in the oven is getting the nice golden-brown and crusty top that everyone loves!


be very, very careful when enjoying these pies as they are absolutely MOLTEN on the inside (oh, and the ramekins themselves are very hot... a little fact that I forgot when picking one up...).  this is a perfect dish when you want a little taste of home or a big punch of flavor in your own personal cup :]

share these with friends or eat them all by yourself!  enjoy!

Wednesday, November 3, 2010

a dinner party for boys.

i ran into a few of my friends the other day on the way out to a halloween party.  we started talking and realized that they were long overdue for a dinner party at my apartment (which i was absolutely thrilled to throw as usual) and we made plans to get together on monday night.  before we parted ways, i asked if there was anything in particular they'd like me to make.  they said that any form of meat between two slices of bread was perfectly fine with them.  sigh.  boys.

here i was, excited to make something elaborate and new, but it seemed that hamburgers were the order of the day.  so, instead of making something boring and predictable, i made my own spin on the comfort food.  ready for this?  inside-out cheeseburgers.  they are quick, flavorful, and with only a few ingredients, even relatively inexpensive.   they are so easy, even a college boy who usually microwaves water for ramen noodles could do it :]

i started by running to the grocery for some ingredients for my party of 8: 
- 1 1/4 lbs. 80/20 ground beef (burgers for the boys, humanely raised if possible- makes 4)
- 1 1/4 lbs. 93/7 ground turkey (lighter for the ladies- makes 4)
- 1 medium sized buffalo mozzarella ball
- 2 tsp dried rosemary
- 2 tsp crushed red pepper flakes
- S&P to taste
- olive oil
- small head of boston lettuce
- 2 medium vine-ripened tomatoes
- wheat hamburger rolls (i find ones with no HFCS and high fiber)

*a note about the beef:  i used 80/20 ground beef because i wasn't too concerned with the fat content for growing college boys.  if you want to turn this in to a slightly leaner burger, go with the 92/8 ground beef option by Laura's Lean Beef which still has lots of flavor, but a fraction of the fat.  or, just as easily, make all the burgers turkey burgers!

i started off with crafting my delicious and lighter turkey burgers.  i put the lean turkey into a bowl along with a healthy pinch of salt, some good cracks of black pepper, a drizzle of olive oil to keep them moist, and two teaspoons (or less-- do this to your liking) of dried rosemary.  **crush the rosemary in your hand before you add it to the meat and it will release its flavor better!  i mixed the meat and spices gently together and then using my hand, scored the meat into 4 equal pieces.

taking the first quarter, split the portion in half and form the meat into two thin patties. then take a slice of buffalo mozzarella and place it on one patty and cover it with the remaining half (shown in the photo to the right).  pinch the edges together to seal the cheese in between the top and bottom, and set aside.  repeat this with the other three turkey burgers, set them on a plate, and stick them in the fridge while you make the beef burgers.

for the beef burgers, put the meat in a bowl and add a pinch of salt, a good bit of cracked pepper, and 2 tsp. (or less) of crushed red pepper flakes for some kick.  you won't need to drizzle these with olive oil since the meat has a high enough fat content to stay moist through grilling.  follow the same steps as before and fill the beef burgers with a piece of mozzarella and seal them up.  place them in the fridge.  here's what they all look like when they are in their cute hamburger shapes:


once you are ready to cook, warm up your grill pan or skillet with a touch of olive oil in the bottom and begin to grill the burgers.  i did mine in two batches, turkey first and then beef.  **note:  although you can undercook your beef burgers (medium, medium well, etc), you can't undercook a turkey burger! ** cook the turkey burgers on medium-medium high heat for about 4-5 minutes per side, making sure they are completely cooked through.  grill the beef burgers to your liking (medium well is about 3-4 minutes per side).

get the boston lettuce washed and separated into fluffy leaves for your guests to pop on their sandwiches.  slice the tomato into thick pieces and put out extra mozzarella if you have it (add basil and you have a tomato/basil/mozzarella burger!)  you're welcome to warm or grill the buns if you'd like, but i tend to like mine as-is.

i served my meal with french fries and black seedless grapes (picnic style!).  also try these delicious inside-out burgers with a salty italian pasta salad, or even a juicy fruit salad.  if you're feeling adventurous, try a greek salad with cucumber, tomato, olives, and feta!  the possibilities are endless.

this is sure to please even the most picky eaters.  try this out on your fam and let me know how it goes!  or, if you are a college boy reading this, these burgers are very impressive to make for a date :]  enjoy!

Inside-Out Mozzarella Cheeseburgers

Sunday, October 31, 2010

the best food in charlottesville: boylan heights

i've decided to start a series on this blog about the best food in charlottesville.  i've tried a smattering of restaurants around town, some icky, some mediocre, and some absolutely fabulous ones.  i'll share my favorite meals and restaurants here so that you can go try them out!  the first post in this series is about my number one favorite place to eat around UVA: boylan heights.

i'm about to make you jealous.

if you have never heard of this incredible establishment, it is a "gourmet burger bar" where you can pick from a selection of ridiculous creations already set on their menu, or pick up a scantron sheet and make your own.  they come with delectable shoestring or sweet potato fries (and sometimes tots!!) and you walk out at the end of the night in the middle of a food coma.

they boast natural and local ingredients (right up my alley!) which you can totally taste in each bite, from the burger buns from local bakeries around town, to tomatoes and lettuce grown from small farms that i see selling the same produce at the farmers' market every weekend.

can i please just tell you about their veggie burger?  it is about as far from a Boca burger as you can get.  nothing is processed about this patty--and it is certainly not a flat hockey puck of rubbery beans.  it is a quinoa base (a grain high in protein and fiber!) with fresh bell peppers, corn, black beans, tomatoes, charred zucchini and all sorts of green herbs (parsley, cilantro, and oregano i'm guessing).  it is loosely formed into a fat patty and grilled on the flat-top just like a regular burger is, so it even has that crust on the outside.  i recommend the veggie burger to absolutely everyone that i take to boylan and i have it almost every time i go (and i'm not even a vegetarian!)

photo courtesy of boylan's flickr
there are other things on the menu besides burgers, however.  i have heard tell that their BLT is just the right ratio of bacon to lettuce and juicy farm-stand tomato, and it is grilled to a crispy crunch on the griddle.  their salads are refreshing (and you can get any burger bun-less in a bowl on top of a bed of mesclun greens instead of with fries!).  but there is also my mother's favorite item that makes her crave boylan every time the fam comes to visit:  the grilled peanut butter and banana sandwich.  it is a gorgeous creation of PB&B on toasty white bread, grilled until everything is melty inside.  it even comes with a side of honey for dipping (which is my mom's favorite part :] ).  i'm not saying it won't cause the onset of diabetes, but it surely is a treat every once and a while.

but by far my favorite part of going to this restaurant is finding out what the B.O.M.B. is ("burger of the month" for you first-timers).  it is always some new and exciting creation that leaves me drooling once i see it pass by.  i'm not just talking about making a "featured burger" that has some interesting topping every month.  nope.  these BOMBs go all out: salmon burgers on a bed of asian sticky rice and veg, chorizo burger with avocado, lettuce, tomato, and spicy siracha mayo, etc.  absolutely nuts.  this month (october), the BOMB was a pork, veal, and beef burger topped with a tomato/basil/mozzarella salad and a light pesto mayo on a local olive-oil roll.  i went most recently for my birthday with a huge group of friends and had the masterpiece:

the october BOMB, courtesy of boylan's website

like i mentioned before, if you are an inventor of your own, you are also welcome to build-your-own burger.  there are a million toppings, from tillamook cheddar to a fried egg, to a big fat onion ring.  a friend of mine built her own at my birthday bash and i snapped a quick shot before it was demolished:


to summarize, boylan heights is completely and totally a must-eat when you are looking for a delicious meal in charlottesville.  it is not super expensive, the atmosphere is casual and fun (sports games on flat-screens galore!), and i hear they have legendary brunch on the weekends.  

go check them out!  you will not be disappointed! 

Saturday, October 30, 2010

couscouscouscous.

guys!  i finally got to use my adorable tri-colored pearl couscous!  i know that might not seem super exciting to you, but i bought it like at the beginning of the semester and haven't had a chance to cook with it before now!  (it's dried.. don't worry.  it doesn't go rancid).


i recently stumbled upon a recipe for a stuffed green pepper that used a mediterranean couscous stuffing instead of the traditional ground beef filling.  i was SUPER excited to make up my own recipe for the stuffing (because this would give me the excuse i needed to use my pearl couscous!) and made a special grocery trip just for this dinner.  it made enough for 4... but i generally eat dishes for a few days afterwards as leftovers, so it worked well for me.  but i would totally recommend making this dish for a dinner party or just as a quick, healthy dish for the fam on a weeknight!

here's what you need:  four green peppers, two chicken breasts, one small zucchini, one large tomato, one cucumber, one cup uncooked pearl couscous, chicken bullion cube (or chicken stock), a cup of feta cheese, lemon juice, olive oil, S&P, and a 1/3 cup of fresh cut cilantro.

to start, clean out your four green peppers by cutting off the tops (save them!) and removing the seeds and ribs.  **note: these are sweet peppers, not hot ones like jalepenos or anything, so removing the insides is just so you can eat the entire pepper, not to remove the heat.   once cleaned, put them in a pot of boiling water for about 6-9 minutes or until they are firm but slightly tender.  these are the edible cups for your couscous filling!  set them aside to cool.

follow the instructions on the back of your pearl couscous package and cook it accordingly, adding either one chicken bullion cube to the correct amount of water, or just substitute the water for chicken stock.  add about a tablespoon of olive oil to the couscous after it has cooked to keep each individual grain separate from the others!  let this cool.


next, take the green pepper tops that you saved and cut them into bite-size pieces.  cut the zucchini in half lengthwise and slice it into half-moon shapes roughly the size of your green pepper pieces.  at this point, take two chicken breasts (responsibly raised / organic if possible) and slice them in to the same size pieces.  **note:  is your chicken too soft to cut into small chunks?  put it in the freezer for 10-15 minutes and it will be easier to cut!


throw this whole mixture into a skillet with a drizzle of olive oil and sauté until soft and sizzl-y.  put this off to the side to cool.

while the other pieces cool, wash and dice one large tomato and one medium sized cucumber.  you are welcome to seed (aka take the seeds and insides out) of both the tomato and the cucumber, but i would recommend leaving them in as they have lots of flavor!  chop about 1/3 cup of cilantro (or you can use parsley if you're crazy and not a cilantro person..).

time to assemble!  take the cooled chicken and sauteed vegetables, the chopped tomato and cucumber, the fresh cilantro, and a cup of feta cheese and toss them all together with the pearl couscous.  add a generous squeeze of lemon juice (fresh preferably), a drizzle of olive oil, and some S&P to taste.  here's what the stuffing should look like:


finally, take your four cooled peppers and stuff them generously with the stuffing.  if you have leftovers of the filling, it is great with pita chips as an appetizer or just with a spoon for a light lunch!  i would recommend serving this dish with a cool greek salad on the side and maybe some toasty slices of baguette with butter.  


enjoy this fresh and healthy supper!